Use Headless CMS in Your Next Project
Save days setting up the backend using headless CMS
Nov 30, 2024

Busy developers need tools that simplify their workflows, and headless CMS is one of them. It enables you to manage database effortlessly while giving you full control over the frontend.
What Is a Headless CMS?
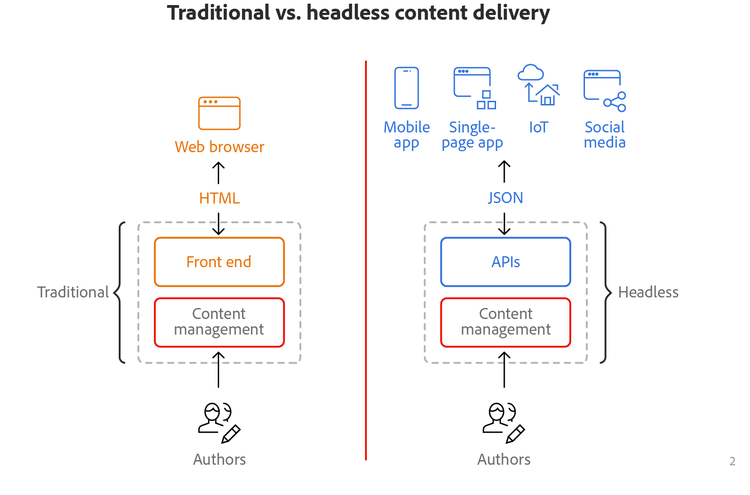
Traditional CMS platforms like WordPress and Blogspot bind content and design together, limiting flexibility. When a request is made to these services, the response includes both content and data, not separated.
If you want to separate the two, you'd need to develop custom code for each, which can be time-consuming. This is especially frustrating for frontend developers who just want to focus on crafting the presentation, rather than managing both content and design.
A headless CMS creates a content database that is separate from the presentation layer. This allows developers to focus solely on crafting the frontend presentation, without worrying about how content is managed.
It's called 'headless' because it doesn't impose a specific frontend ('head'). Think of it like a human body without a head—any head (frontend) can be attached to this body (the CMS) to create a new app. The database (CMS) is the body, while the frontend is the head.

Popular Providers of Headless CMS
- Sanity.io: Known for real-time collaboration, flexible schemas, and powerful querying. Use it for highly dynamic projects requiring customization.
- Strapi: Open-source and self-hosted, giving full backend control. Ideal for projects needing extensive customization and self-hosting.
- Contentful: SaaS platform with robust scalability and multi-channel delivery. Best for enterprise-level projects with diverse content needs.
Choose a provider based on your project’s size, budget, and complexity.
How to Set Up Sanity.io with Next.js (with Code Examples)
Let's create simple blog project. To set up a headless CMS using Sanity.io for a blog with fields for title, date, and content in Next.js, follow these steps:
0. Setup Next.js App
npx create-next-app@latest1. Install Sanity CLI and Create a Project
First, install the Sanity CLI:
npm install -g @sanity/cliCreate a new Sanity project:
sanity initDuring this initialization, you will be required to:
- Log in to your Sanity account. Create one if you don't have an account.
- Choose the project and dataset.
- Select a template (for a blog, the 'Blog' template is a good starting point) and follow the prompts to set up your project
2. Define Your Schema
In your Sanity studio folder, modify the schema to include title, date, and content.
Create a new file schemas/post.js:
export default {
  name: 'post',
  title: 'Post',
  type: 'document',
  fields: [
    {
      name: 'title',
      title: 'Title',
      type: 'string',
    },
    {
      name: 'date',
      title: 'Date',
      type: 'datetime',
    },
    {
      name: 'content',
      title: 'Content',
      type: 'blockContent',
    },
  ],
};
Then, register this schema in the schema.js file:
import post from './post';

export default createSchema({
  name: 'default',
  types: schemaTypes.concat([post]),
});
3. Deploy the Sanity Studio
After defining your schema, deploy the Sanity studio:
sanity deploy4. Install Sanity Client in Next.js
In your Next.js project, install the Sanity client to fetch data:
npm install @sanity/client5. Setup Sanity Client
Create a lib/sanity.js file to configure the Sanity client:
import sanityClient from '@sanity/client';

export const client = sanityClient({
  projectId: 'your-project-id', // Replace with your Sanity project ID
  dataset: 'production', // Replace with your dataset name
  useCdn: true,
});
6. Fetch Blog Data in Next.js
In your Next.js pages, use the Sanity client to fetch data.
For example, create a pages/index.js to display the blog posts:
import { client } from '../lib/sanity';
import BlockContent from '@sanity/block-content-to-react';

const Home = ({ posts }) => {
  return (
    <div>
      <h1>Blog</h1>
      {posts.map((post) => (
        <div key={post._id}>
          <h2>{post.title}</h2>
          <p>{new Date(post.date).toLocaleDateString()}</p>
          <div>
            <BlockContent blocks={post.content} />
          </div>
        </div>
      ))}
    </div>
  );
};

export async function getStaticProps() {
  const query = `*[_type == "post"]{_id, title, date, content}`;
  const posts = await client.fetch(query);

  return {
    props: { posts },
    revalidate: 60, // Regenerate page every minute
  };
}

export default Home;
7. Install @sanity/block-content-to-react for Rendering Content
To render the blockContent from Sanity in Next.js, install the necessary package:
npm install @sanity/block-content-to-react8. Customize the Block Renderer
Optionally, you can customize how the content blocks are rendered by passing custom serializers to BlockContent:
import BlockContent from '@sanity/block-content-to-react';

const serializers = {
  types: {
    // Example of customizing the rendering of an image block
    image: (props) => (
      <img src={props.node.asset.url} alt={props.node.alt} style={{ maxWidth: '100%' }} />
    ),
  },
};

const Home = ({ posts }) => {
  return (
    <div>
      <h1>Blog</h1>
      {posts.map((post) => (
        <div key={post._id}>
          <h2>{post.title}</h2>
          <p>{new Date(post.date).toLocaleDateString()}</p>
          <BlockContent blocks={post.content} serializers={serializers} />
        </div>
      ))}
    </div>
  );
};
9. Run Your Next.js App
Now, start your Next.js app to see the blog:
npm run dev
Summary
- Sanity Studio: Set up a schema for your blog with
title,date, andcontent. - Next.js: Use the Sanity client to fetch the blog data and display it, using
@sanity/block-content-to-reactto render the rich text content.
This setup will display your blog posts in Next.js with formatted content from Sanity's block type.
Closing
Headless CMS tools like Sanity.io are transforming the way developers work. They’re simple to set up, flexible, and integrate seamlessly with modern frontend frameworks. Whether you’re building a blog, e-commerce site, or app, a headless CMS can save you time and effort. Start exploring today—you won’t regret it.