PHP Concepts to Start a Project (Part 2)
Speed up your PHP project by learning these 101 key concepts
Dec 02, 2024

Table of Content
Note: This is part 2 of "PHP Concept to Start a Project" series. If you haven't read part 1 yet , check it out here.
In the first part, we covered basic PHP syntax, user input handling, and sessions/cookies. Now, in the second part, we'll dive into databases and build a simple full-stack app using the MVC design pattern.
Managing Database
A database is crucial for storing and managing large amounts of data persistently. While variables in PHP store data temporarily during runtime, a database allows your application to handle dynamic content, user accounts, or large datasets persistently.
In this section, we’ll explore how to connect PHP to MySQL, perform CRUD operations, and secure your queries with prepared statements.
Connect to Database
To connect to a MySQL database, you can use mysqli class. It is a built-in class in PHP for interacting with MySQL databases.
<?php

$host = 'localhost';
$username = 'root';
$password = '';
$database = 'my_database';

// Connect to database
$conn = new mysqli($host, $username, $password, $database);

// Check connection
if ($conn->connect_error) {
    die("Connection failed: " . $conn->connect_error);
    // die() is a function that outputs a message and stops
    // the execution of the script.
}
echo "Connected successfully!";
?>
To connect to MySQL using mysqli, you need four key pieces of information: the host (usually localhost), username (default is root), password (often blank in local setups), and the database name. We’ll create from scratch.
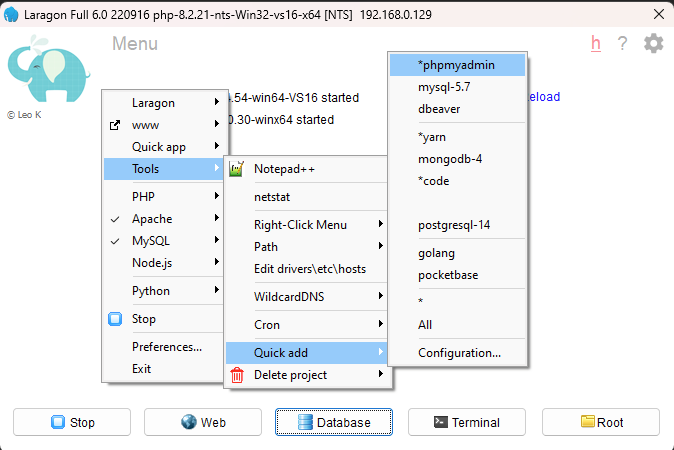
First, install phpMyAdmin, an open-source GUI for managing MySQL:
- Open Laragon.
- Right-click in the empty area of the Laragon window.
- Select Tools → Quick add → phpMyAdmin.

- Once installed, go to
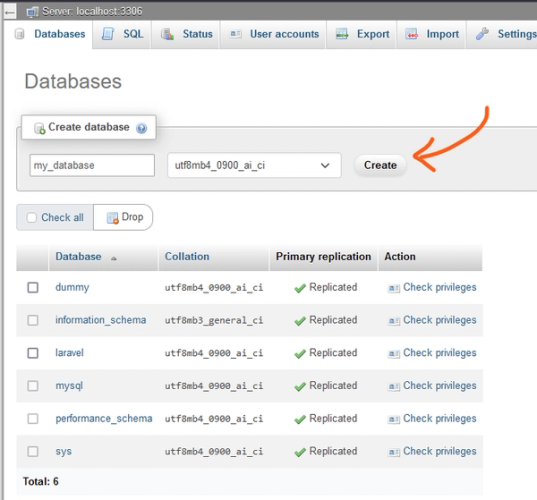
http://localhost/phpmyadmin/or click the Database menu in Laragon. You will be taken to the phpMyAdmin dashboard. - Click the Database menu, then create a new database (Don't forger to add database name)

- Congrats! You’ve successfully created a database. Now, still in phpMyAdmin, go to Home → User Settings → root → Edit Privileges → Login Information. This is the information you’ll need to copy into your PHP code to connect to the database.
Create Table
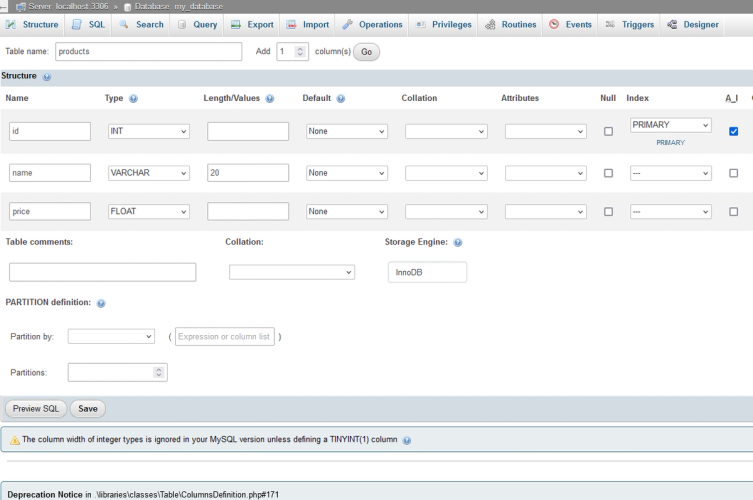
- Go to phpMyAdmin -> Databases -> Select the database you've created, and then create a new table (don’t forget to add a name).
- Create table by filling the necessary informations. Here is example of table products

Insert Data
<?php
$sql = "INSERT INTO products (name, price) VALUES ('Milk', 10)";
if ($conn->query($sql) === TRUE) {
    echo "New record created successfully!";
} else {
    echo "Error: " . $conn->error;
}
?>
Read Data
<?php
$sql = "SELECT * FROM products";
$result = $conn->query($sql);

if ($result->num_rows > 0) {
    while ($row = $result->fetch_assoc()) {
        echo $row['name'] . " - " . $row['price'] . "<br>";
    }
} else {
    echo "No records found.";
}
?>
Update Data
<?php
$sql = "UPDATE products SET price = '12' WHERE id = '1'";
if ($conn->query($sql) === TRUE) {
    echo "Record updated successfully!";
} else {
    echo "Error: " . $conn->error;
}
?>
Delete Data
<?php
$sql = "DELETE FROM products WHERE id = '1'";
if ($conn->query($sql) === TRUE) {
    echo "Record deleted successfully!";
} else {
    echo "Error: " . $conn->error;
}
?>
Securing Statement
Prepared statements in MySQLi help prevent SQL injection by binding parameters securely.
<?php
$stmt = $conn->prepare("SELECT * FROM products WHERE id = ?");
$stmt->bind_param("s", $input_id); // 's' indicates the parameter is a string
$input_id = '1';
$stmt->execute();

$result = $stmt->get_result();
while ($row = $result->fetch_assoc()) {
    echo $row['name'] . " - " . $row['price'] . "<br>";
}
$stmt->close();
?>
Closing the Connection
Always close the database connection after use:
<?php
$conn->close();
?>
Build Real PHP Project using MVC Design Pattern
What is MVC?
MVC (Model-View-Controller) is a design pattern that divides an application into three components:
- Model: Handles data and business logic.
- View: Displays the data to the user.
- Controller: Manages user input and updates the model and view accordingly.
MVC improves organization, maintainability, and scalability by separating concerns. It is particularly useful for complex applications, like an online store, by keeping the codebase clean and easier to manage.
Project Description
We'll build a simple online store using MVC, allowing users to:
- Add products
- Edit product details
- Delete products
- View a list of products
This app will interact with a MySQL database and follow the MVC pattern for easy scalability and organization.
Directory Structure
/online-store
    /app
        /controllers
            ProductController.php
        /models
            Product.php
        /views
            product_list.php
            product_create.php
            product_edit.php
    /config
        db.php
    /public
        index.php
Configuration File (db.php)
In the config/db.php file, we'll store the database connection details.
<?php
$host = 'localhost';
$username = 'root';
$password = '';
$dbname = 'online_store';

$conn = mysqli_connect($host, $username, $password, $dbname);

if (!$conn) {
    die("Connection failed: " . mysqli_connect_error());
}
?>
Product Model (Product.php)
In the app/models/Product.php file, we'll define the CRUD operations for products.
<?php
include_once '../config/db.php';

class Product {
    public $id;
    public $name;
    public $price;
    public $stock;

    public function create() {
        global $conn;
        $sql = "INSERT INTO products (name, price, stock) VALUES ('$this->name', '$this->price', '$this->stock')";
        return mysqli_query($conn, $sql);
    }

    public function update() {
        global $conn;
        $sql = "UPDATE products SET name='$this->name', price='$this->price', stock='$this->stock' WHERE id=$this->id";
        return mysqli_query($conn, $sql);
    }

    public function delete() {
        global $conn;
        $sql = "DELETE FROM products WHERE id=$this->id";
        return mysqli_query($conn, $sql);
    }

    public static function getAll() {
        global $conn;
        $sql = "SELECT * FROM products";
        $result = mysqli_query($conn, $sql);
        return mysqli_fetch_all($result, MYSQLI_ASSOC);
    }

    public static function getById($id) {
        global $conn;
        $sql = "SELECT * FROM products WHERE id=$id";
        $result = mysqli_query($conn, $sql);
        return mysqli_fetch_assoc($result);
    }
}
?>
Product Controller (ProductController.php)
In the app/controllers/ProductController.php, we'll manage the logic for handling user actions, such as creating, updating, deleting, and viewing products.
<?php
include_once '../models/Product.php';

class ProductController {

    public function list() {
        $products = Product::getAll();
        include '../views/product_list.php';
    }

    public function create() {
        if ($_SERVER['REQUEST_METHOD'] === 'POST') {
            $product = new Product();
            $product->name = $_POST['name'];
            $product->price = $_POST['price'];
            $product->stock = $_POST['stock'];
            if ($product->create()) {
                header('Location: /');
            }
        }
        include '../views/product_create.php';
    }

    public function edit($id) {
        $product = Product::getById($id);

        if ($_SERVER['REQUEST_METHOD'] === 'POST') {
            $product->name = $_POST['name'];
            $product->price = $_POST['price'];
            $product->stock = $_POST['stock'];
            if ($product->update()) {
                header('Location: /');
            }
        }
        include '../views/product_edit.php';
    }

    public function delete($id) {
        $product = new Product();
        $product->id = $id;
        if ($product->delete()) {
            header('Location: /');
        }
    }
}
?>
Views
product_list.php
<?php include_once '../app/controllers/ProductController.php'; ?>

<h1>Product List</h1>
<a href="/create.php">Create Product</a>
<table border="1">
    <thead>
        <tr>
            <th>ID</th>
            <th>Name</th>
            <th>Price</th>
            <th>Stock</th>
            <th>Actions</th>
        </tr>
    </thead>
    <tbody>
        <?php foreach ($products as $product): ?>
        <tr>
            <td><?php echo $product['id']; ?></td>
            <td><?php echo $product['name']; ?></td>
            <td><?php echo $product['price']; ?></td>
            <td><?php echo $product['stock']; ?></td>
            <td>
                <a href="/edit.php?id=<?php echo $product['id']; ?>">Edit</a>
                <a href="/delete.php?id=<?php echo $product['id']; ?>">Delete</a>
            </td>
        </tr>
        <?php endforeach; ?>
    </tbody>
</table>
product_create.php
<h1>Create Product</h1>
<form method="POST">
    <label>Name:</label><input type="text" name="name" required><br>
    <label>Price:</label><input type="text" name="price" required><br>
    <label>Stock:</label><input type="number" name="stock" required><br>
    <button type="submit">Create</button>
</form>
product_edit.php
<h1>Edit Product</h1>
<form method="POST">
    <label>Name:</label><input type="text" name="name" value="<?php echo $product['name']; ?>" required><br>
    <label>Price:</label><input type="text" name="price" value="<?php echo $product['price']; ?>" required><br>
    <label>Stock:</label><input type="number" name="stock" value="<?php echo $product['stock']; ?>" required><br>
    <button type="submit">Update</button>
</form>
Index and Routing (index.php)
The index.php file will route to the appropriate controller method based on the URL.
<?php
require_once 'app/controllers/ProductController.php';

$controller = new ProductController();

if ($_SERVER['REQUEST_URI'] === '/') {
    $controller->list();
} elseif ($_SERVER['REQUEST_URI'] === '/create.php') {
    $controller->create();
} elseif ($_SERVER['REQUEST_URI'] === '/edit.php') {
    $id = $_GET['id'];
    $controller->edit($id);
} elseif ($_SERVER['REQUEST_URI'] === '/delete.php') {
    $id = $_GET['id'];
    $controller->delete($id);
}
Congrats! You have built fully-functioned MVC design pattern of simple online store!
Closing
Congrats! You've completed this PHP tutorial and learned the essential concepts to start a project. You've mastered PHP syntax, handling user input, working with sessions and cookies, connecting to a MySQL database, and applying the MVC design pattern. With these skills, you’re now equipped to build dynamic, interactive web applications.
Next, explore more advanced topics like PHP frameworks (e.g., Laravel), integrating APIs, or improving security. Keep experimenting by building more complex projects, and don’t forget to practice regularly. Happy coding!